Driveway Gravel Calculator: Buy the Right Amount
A new gravel driveway is a smart investment in your property’s function and curb appeal, but sticking to a budget is key. The cost of materials is often the biggest line item, and nothing blows a budget faster than ordering the wrong amount. Paying for gravel you don’t use is wasteful, and incurring a second delivery fee for a small top-off order is frustrating. Using a driveway gravel calculator is the first step in creating an accurate budget. It helps you get a precise material estimate so you can plan your expenses without any surprises. We’ll cover how to calculate your needs, estimate total project costs, and make smart choices to get the best results for your money.
Key Takeaways
- Start with Accurate Measurements: Your project's success begins with correct numbers. Carefully measure your driveway's length, width, and depth, then use an online calculator to convert those figures into the exact cubic yards you need to order.
- Build in Layers for Durability: A stable gravel driveway requires more than just one type of stone. Plan for a multi-layer system with a coarse base for support, a middle layer for drainage, and a finer top layer for a smooth, functional surface.
- Account for Compaction and Total Costs: To avoid running short, add about 10% to your final material calculation to account for natural settling. When budgeting, be sure to include the price of the gravel, delivery fees, and any potential installation expenses.
What Is a Driveway Gravel Calculator?
Figuring out how much gravel you need for a new driveway can feel like a tricky guessing game. Order too little, and you’re left with a patchy, unfinished project. Order too much, and you’ve wasted money on materials you can’t use. This is where a driveway gravel calculator comes in. It’s a simple online tool that removes the guesswork, helping you plan your project with confidence and get it right the first time. By using one, you can ensure you purchase the perfect amount of material for your specific needs.
What It Does and How It Works
A driveway gravel calculator is a straightforward tool designed to determine the exact amount of gravel required for your project. It works by taking the basic measurements of your space—length, width, and desired depth—and calculating the total volume of material needed. You simply input your numbers, and the calculator does the math for you. This prevents the common headache of running out of material mid-project or having a huge pile left over. Our own Volume Calculator is designed to give you a quick and accurate estimate so you can move on to the exciting part: choosing your materials.
The Basic Formula
You don’t need to be a math expert to understand what’s happening behind the scenes. The calculator uses a simple formula: Length × Width × Depth = Volume. For instance, if you’re paving a 50-foot-long by 10-foot-wide area with a 4-inch layer of gravel, the tool multiplies these dimensions to find the total volume. It then converts this figure into cubic yards, which is the standard unit of measurement for ordering bulk landscape supplies. This simple calculation is the key to ordering the right amount of sand, stone, or gravel for a perfect finish.
Types of Calculators
While most online calculators work similarly, they can offer slightly different features. Some basic versions will only provide the volume in cubic yards. More advanced calculators might also estimate the total weight in tons (since different materials have different densities) and even provide a rough cost estimate. While a cost feature can be useful for initial budgeting, it’s always best to get a precise quote for the specific materials you choose. Once you have your volume, you can explore our full range of products and contact us for exact pricing and delivery information.
How to Calculate How Much Gravel You Need
Figuring out exactly how much gravel you need can feel like a tricky math problem, but it’s actually pretty straightforward. Breaking it down into a few simple steps ensures you order the right amount—not too much and definitely not too little. With a tape measure and a calculator, you can get a reliable estimate in just a few minutes. Let’s walk through the process together so you can feel confident placing your order.
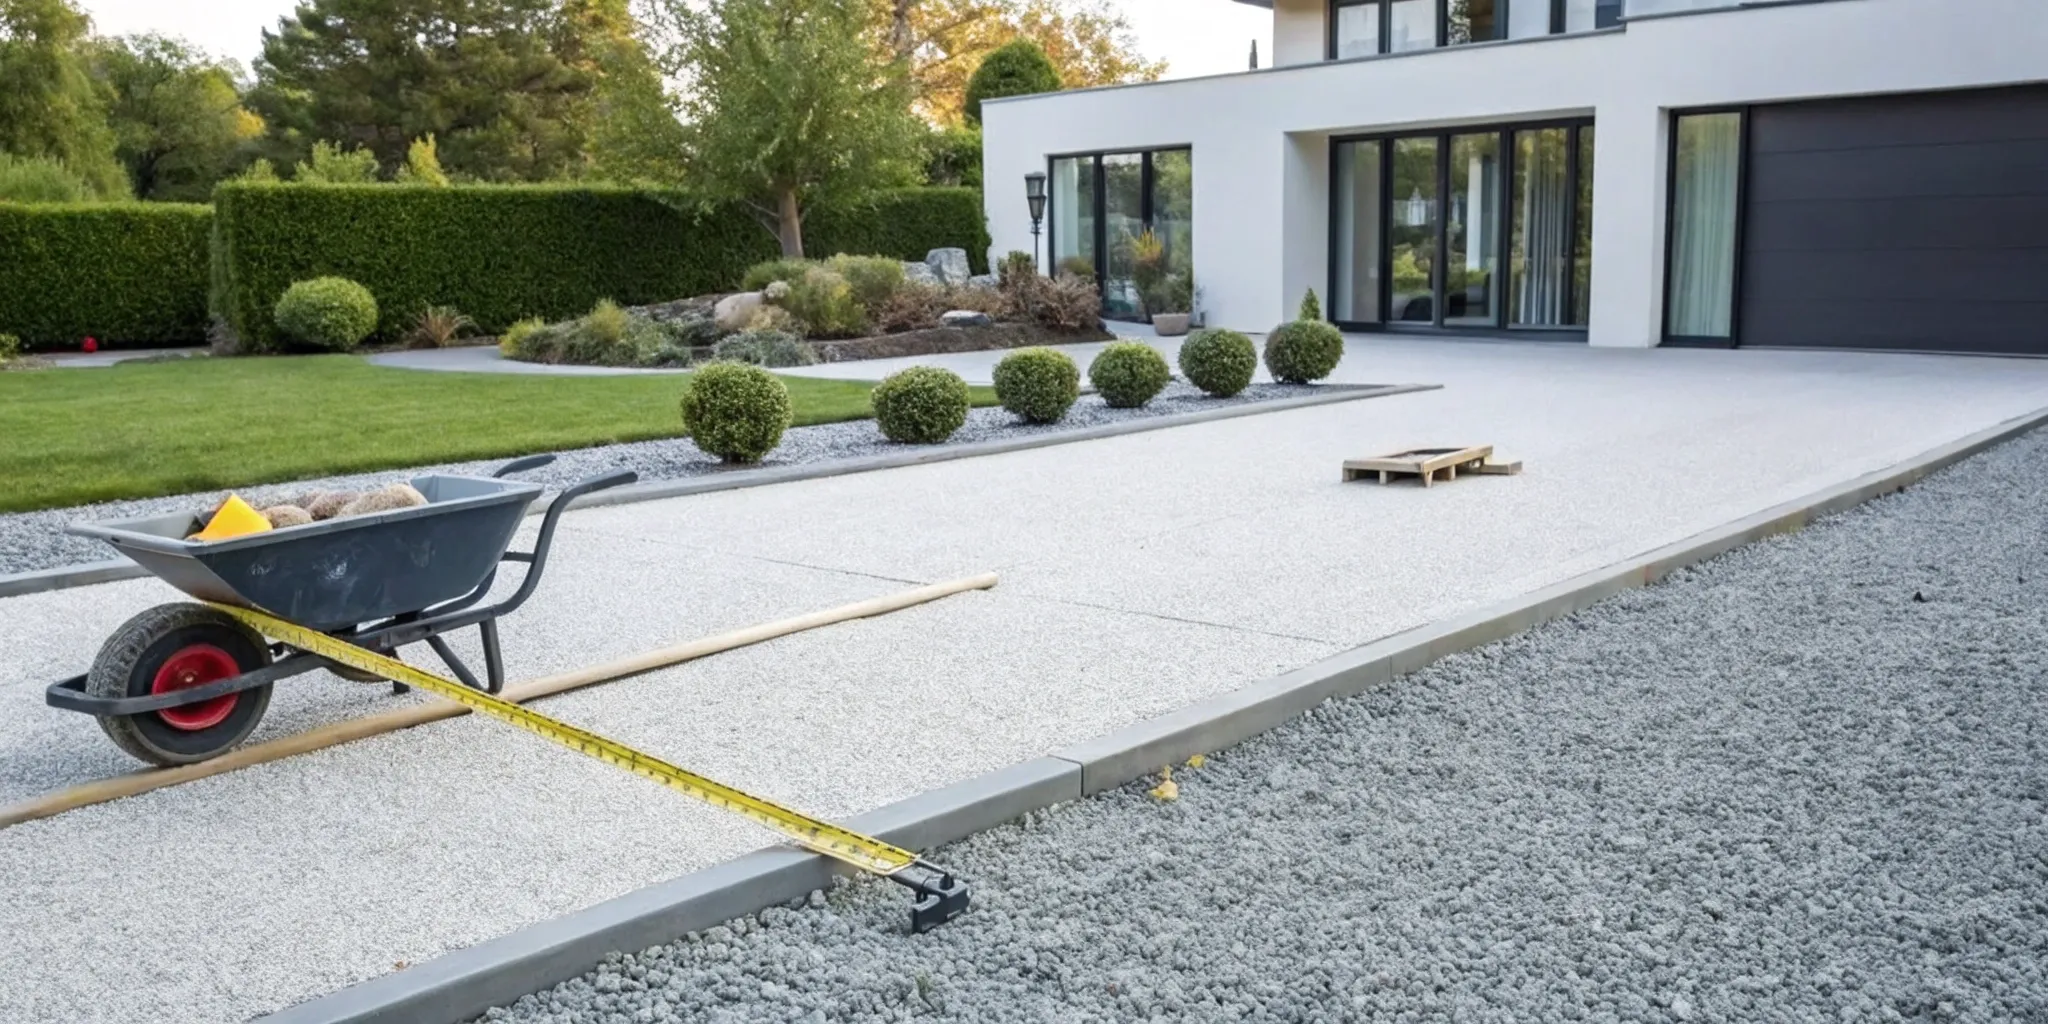
Get Your Measurements
First things first, you need to measure the space you plan to cover. Grab a tape measure and find the length and width of your project area in feet. For a simple rectangular driveway, this is easy. If you have a curved or irregularly shaped area, break it into smaller, manageable rectangles and squares, measure each one, and add them up later. Next, decide on the depth of your gravel in inches. A standard gravel driveway is usually four to six inches deep, but we’ll cover choosing the right depth later on. Write these three numbers down: length, width, and depth.
Follow This Step-by-Step Process
Once you have your measurements, the calculation is simple multiplication. But before you start, make sure all your measurements are in the same unit—feet. Since you likely measured your depth in inches, you’ll need to convert it. Just divide the number of inches by 12 to get the depth in feet. For example, a 4-inch depth is 0.33 feet.
Now, multiply your three measurements together:
Length (ft) x Width (ft) x Depth (ft) = Total Cubic Feet
This gives you the total volume of gravel you need in cubic feet. It’s the foundational number for figuring out your final order quantity.
Convert to Cubic Yards and Tons
Most bulk landscape materials, including gravel, are sold by the cubic yard, not the cubic foot. To convert your total, you’ll divide your cubic feet number by 27 (since there are 27 cubic feet in one cubic yard).
Total Cubic Feet / 27 = Total Cubic Yards
This final number is what you’ll need to place your order. If you want to skip the manual math, you can use an online volume calculator to do the work for you. Just plug in your dimensions, and it will give you the cubic yards required. Some suppliers also sell by the ton, and while the exact weight varies by stone type, a general rule is that one cubic yard of gravel weighs about 1.4 tons.
Account for Compaction
Gravel settles and compacts over time, especially in a high-traffic area like a driveway. As you drive over it, the stones will shift and lock into place, reducing the total volume. To avoid ending up with a thinner layer than you planned, it’s a good idea to add a little extra to your order. A safe bet is to add 10% to your total cubic yard calculation to account for this compaction. This ensures you have enough material to achieve your desired depth and won’t need a last-minute gravel delivery to finish the job.
Choose the Right Gravel Depth and Type
Once you know your driveway's dimensions, the next step is to think about the gravel itself. The right depth and type are crucial for creating a driveway that not only looks great but also holds up for years. It's not just about pouring rocks on the ground; it's about building a stable, functional surface that can handle traffic and weather. Let's walk through how to select the perfect gravel for your project, from the foundation to the finishing touches. Choosing correctly will ensure your driveway is durable, drains properly, and has the look you want.
Match Gravel Depth to Traffic
The first thing to consider is what you'll be driving on it. For a standard family car, a total gravel depth of about 6 to 8 inches is usually sufficient to create a stable surface. However, if you plan on parking heavier vehicles like an RV, a large truck, or construction equipment, you'll want to aim for a deeper base of 8 to 12 inches. This extra depth provides the necessary support to prevent ruts, distribute the weight evenly, and ensure the driveway remains stable under heavy loads for years to come.
Explore Popular Gravel Types
Gravel isn't a one-size-fits-all material. Different types serve different purposes, especially when you're building in layers. You'll find various kinds of sand, stone, and gravel, from large, angular crushed stone ideal for a solid base to smaller, rounded pea gravel or river rock for a decorative top layer. The type you choose for each layer will impact both the stability and the final look of your driveway. Angular stones lock together well for a firm foundation, while smoother stones provide a more polished finish.
Understand Base vs. Top Layers
A durable gravel driveway is built like a layer cake. It typically consists of three distinct layers that work together. The bottom layer, or sub-base, is made of large, coarse stone (like #3 crushed stone) about 6 inches deep to create a solid foundation. The middle layer uses a smaller stone (like #57 crushed stone) for another 6 inches to help with drainage and stability. Finally, the top layer is what you see—about 4 to 8 inches of smaller, more attractive gravel that creates a smooth, finished surface for driving on.
Factor in Drainage and Slope
Proper drainage is your driveway's best friend. Without it, water can pool, wash away your gravel, and create a muddy mess. As you plan, think about where rainwater will go. A slight slope or crown in the center of the driveway can help direct water to the sides. Building your driveway with the right depth and layers also helps water filter through instead of sitting on top. Taking the time to plan for drainage now will save you a lot of headaches and repair costs later on, protecting your investment.
Estimate Your Total Driveway Cost
Once you know how much gravel you need, the next step is figuring out what it will all cost. Your total project price is more than just the cost of the stone itself. To create a solid budget, you’ll need to account for the materials, delivery, and the labor to get the job done. Let's break down each piece so you can plan your project without any financial surprises.
Calculate Material Costs
The price of the gravel is your starting point. Generally, you can expect to pay between $4 and $10 per square foot for a gravel driveway. The exact cost depends heavily on the type of stone you choose—decorative options will be on the higher end of that range. To get a good initial estimate, take the total square footage of your driveway and multiply it by the per-foot cost of your chosen gravel. You can explore different types of sand, stone, and gravel to see what fits your budget and aesthetic.
Include Delivery Fees
Getting all that heavy material to your home is the next cost to consider. Delivery fees are standard for bulk materials and will vary based on your location and the size of your order. It’s also a smart move to order about 10% more gravel than your calculations suggest. This little buffer covers any spills, spreading inconsistencies, or settling that happens over time, saving you from placing a second, smaller (and less cost-effective) delivery order later. You can find more details by checking the company’s delivery information to see how pricing works for your area.
Add Installation Expenses
This is where you decide between sweat equity and hiring a pro. If you go the DIY route, your main costs are tool rentals and your time. If you hire a contractor, labor can make up a significant portion of your total budget, with hourly rates often ranging from $30 to $100. While hiring professionals adds to the upfront cost, they have the equipment and experience to prepare the site and install the driveway correctly and efficiently. It’s worth getting a few quotes to see how it fits into your overall budget.
Create an Accurate Budget
To put it all together, your final budget should reflect every part of the project. Consider the driveway's size, the type and depth of gravel you've selected, any site preparation work needed (like excavation or grading), delivery fees, and labor costs. Each of these factors influences the total price. The best way to create an accurate budget is to list out each potential expense. Use a volume calculator to confirm your material needs, then get a firm quote for the gravel and delivery to your specific location.
Gravel Calculation Mistakes to Avoid
Even with the best tools, a few common missteps can lead to ordering the wrong amount of gravel. Buying too much means you’ve overspent and have a pile of rock to deal with, while buying too little forces you to pause your project and place a second order. A little planning helps you sidestep these issues, saving you time, money, and a whole lot of frustration. Let’s walk through the most frequent mistakes so you can get your gravel calculation right the first time.
Inaccurate Measurements
The most common error is also the easiest to avoid: inaccurate measurements. If your length, width, or depth figures are off, your entire calculation will be incorrect. A small mistake in measuring can result in a significant shortage or surplus of material. Before you use a volume calculator, grab a long tape measure and carefully record the dimensions of your driveway. For irregularly shaped areas, break them down into smaller, manageable rectangles and triangles, calculate each one separately, and then add them together. It’s always a good idea to measure twice to confirm your numbers before placing an order.
Forgetting Compaction and Waste
Loose gravel takes up more space than compacted gravel. Once you spread the material and it settles under the weight of vehicles, its volume can shrink by as much as 20%. If you don’t account for this, you’ll find your gravel layer is much thinner than you planned. Always factor in compaction when you calculate your needs. It’s also smart to add an extra 5% to 10% to your final number to cover any minor spills or inconsistencies during the delivery and spreading process. This small buffer ensures you have enough material to finish the job without any last-minute shortages.
Skipping Site Prep
A successful gravel driveway starts with a solid foundation. Before you even think about spreading your top layer, the ground beneath needs to be properly prepared. This means clearing away all vegetation, grading the area for proper drainage, and compacting the sub-base. If you skip this step, you risk having an unstable driveway that develops ruts, potholes, and drainage problems. An uneven base also makes it difficult to apply a consistent depth of gravel, which can throw off your material calculations. Proper site preparation ensures your driveway is stable, long-lasting, and looks professional.
Underestimating Future Needs
A gravel driveway isn’t a set-it-and-forget-it project. Over time, traffic, rain, and snow removal will cause the gravel to shift, scatter, and break down. You’ll need to plan for regular maintenance, which includes raking it smooth and adding a fresh layer of gravel every few years to maintain the proper depth. While you don’t need to buy all your future material at once, it’s important to understand this long-term commitment. When you place your initial order, you can always ask us about the future availability of your chosen gravel to ensure a perfect match for touch-ups down the road.
Tips for an Accurate Calculation
Getting your gravel calculation right from the start makes the entire project run smoother. A precise estimate means you order the correct amount of material—no more, no less. This saves you from the headache of running short mid-project and having to place a second order (and potentially pay for another delivery). It also prevents you from overspending on materials you don’t need and then having to figure out what to do with a leftover pile of stone. Taking a few extra minutes to double-check your numbers and prepare your site properly is a small investment that pays off big. Think of it as setting the foundation for a successful, stress-free project. Using a reliable tool, like our volume calculator, can remove the guesswork and give you the confidence that you’re ordering the perfect amount for your driveway.
Measure Twice, Order Once
The old saying for carpenters holds just as true for landscaping projects. Before you place your order, go back and check your length, width, and depth measurements one more time. A small error can have a big impact on the final volume, especially for large driveways. Confirming your numbers helps you buy the right amount of gravel from the get-go, which saves you both time and money. It’s far easier to re-measure than it is to deal with a surplus of stone or a project delay because you didn’t order enough. A quick double-check is your best defense against common calculation mistakes.
Prep Your Site First
For the most accurate measurements, you need a clean slate. Before you measure, take the time to clear the entire driveway area of any grass, weeds, large rocks, or debris. You’ll also want to level the surface as much as possible. Measuring an unprepared site can easily throw off your calculations, causing you to order the wrong amount of gravel. Proper site preparation not only ensures your measurements are correct but also creates a stable base for your new driveway, which helps it last longer and perform better over time.
Pick the Right Calculator
While you can always calculate your gravel needs by hand, using an online calculator is the easiest and most reliable way to get an accurate estimate. These tools are designed to do the math for you, converting your measurements directly into the cubic yards or tons you need to order. Using a dedicated gravel calculator helps prevent simple arithmetic errors and ensures you account for all the variables. It’s a simple step that removes any uncertainty and helps you feel confident that you’re not ordering too much or too little for your project.
Plan for Long-Term Maintenance
A gravel driveway isn’t a one-and-done project. Over time, the gravel will settle, spread, and get displaced by vehicle traffic and weather. To keep it looking and functioning its best, you’ll need to plan for occasional top-ups. Factoring this into your long-term plan is smart. Some people choose to order a small amount of extra material with their initial delivery to have on hand for touch-ups. Others simply budget for future bulk bag deliveries every few years. Thinking ahead ensures your driveway remains in great shape for years to come.
Frequently Asked Questions
My driveway isn't a perfect rectangle. How do I measure it correctly? This is a common situation, and the best approach is to break the area into smaller, regular shapes. Think of it like a puzzle. You can divide your driveway into a series of squares and rectangles, measure each one individually, and then simply add their totals together to get your final square footage. This method ensures you get a much more accurate measurement than trying to estimate a single, oddly shaped area.
Do I really need to use different types of gravel for the layers? Yes, building your driveway in layers is the key to making it last. A proper driveway needs a strong foundation to handle weight and a top layer that looks good and holds up to traffic. Using a large, angular stone for the base creates a stable structure that won't shift, while a smaller, more compact stone for the top provides a smooth and durable driving surface. Skipping the base layer often leads to ruts and drainage issues down the road.
How much extra gravel should I order to be safe? A good rule of thumb is to add about 10% to your final calculated amount. This extra material serves two purposes. First, it accounts for the natural settling and compaction that happens as you drive on the gravel over time. Second, it gives you a small buffer to cover any minor spills or uneven spreading during installation. Having a little extra on hand is much easier than having to place a second order to finish the job.
Besides the gravel itself, what other costs should I budget for? The price of the stone is just one part of the total project cost. You also need to factor in delivery fees, which will depend on your location and the size of your order. If you're hiring a professional for the installation, their labor will be a significant part of the budget. For a DIY project, you might have costs for renting equipment like a compactor to prepare the site properly.
Why can't I just estimate the amount of gravel I need? While it might seem easier to guess, a rough estimate is one of the quickest ways to derail your project. Ordering too little means you'll have to stop work, place another order, and possibly pay for a second delivery fee. Ordering too much wastes money and leaves you with a pile of leftover material to deal with. Taking a few minutes to measure accurately ensures you get exactly what you need the first time.