How to Build with Interlocking Retaining Wall Blocks
Tackling a major landscaping project like a retaining wall can feel like a job reserved only for seasoned professionals. But what if you could get a professional-grade result with a much more forgiving process? That’s the advantage of working with interlocking retaining wall blocks. Designed with clever lips and grooves, these blocks fit together like puzzle pieces, using their own weight and design to create an incredibly strong structure without any messy mortar. This makes them a perfect choice for the ambitious DIYer looking to add serious value and function to their property. In this article, we’ll cover the entire process, from preparing a solid foundation to laying the final capstone, so you can build with confidence.
Key Takeaways
- Strength Without the Mortar: Interlocking blocks get their stability from their weight and clever design—not messy mortar. This makes them easier to install and more forgiving to ground movement, creating a durable wall that can flex instead of crack.
- Build from the Ground Up: The longevity of your wall is determined before you lay the first block. A properly dug trench filled with compacted gravel for the base and backfill is the most critical step for ensuring stability and preventing future problems.
- Plan for More Than Just Blocks: Choosing the right style of block is important, but your project's success also relies on having the right support materials. Accurately calculating your need for a gravel base, drainage stone, and leveling sand is just as vital as picking the perfect block.
What Are Interlocking Retaining Wall Blocks?
If you’ve ever admired a beautifully curved garden bed or a sturdy terraced slope, you were likely looking at an interlocking retaining wall. These specially engineered concrete blocks are the go-to solution for creating strong, stable walls without the hassle of mortar. Unlike a traditional brick or stone wall that relies on cement to hold it together, interlocking blocks are designed to fit together securely, almost like puzzle pieces.
This clever design makes them a favorite for both seasoned landscapers and ambitious DIY homeowners. They offer a straightforward way to manage sloped terrain, prevent soil erosion, and add functional, structured beauty to any outdoor space. Whether you're building a simple garden planter or tackling a major hillside, understanding how these blocks work is the first step toward a successful project.
Key Design Features
The magic of an interlocking block is in its shape. Each block is manufactured with a specific mechanism, usually a rear lip or a system of pins and grooves, that allows it to lock into the blocks above and below it. This creates a continuous, connected structure. The rear lip, for example, hangs over the back of the block in the course below, ensuring each row is set back slightly from the one beneath it. This slight incline, or "batter," gives the wall incredible strength to hold back the pressure of the soil behind it. These blocks are some of the most reliable masonry supplies available for building durable, long-lasting landscape features.
How the Interlocking System Works
Think of the interlocking system as a simple, powerful connection. As you stack each course, the lip or groove on the bottom of a block fits securely onto the one below it. This connection, combined with the sheer weight of the blocks, creates a unified wall that can withstand immense pressure. You don’t need to mess with wet mortar or wait for anything to cure. The system is self-aligning and self-locking, which helps you build straight, even rows with relative ease. This mortarless method is what makes installation so much faster and more forgiving than traditional masonry techniques, allowing the wall to flex slightly with ground movement instead of cracking.
Advantages Over Traditional Walls
So, why choose interlocking blocks over a classic mortared wall? The benefits are pretty clear. First, installation is significantly easier and faster, which can save you time and money on labor. They are an ideal choice for DIY projects because you don't need advanced masonry skills to get a professional-looking result. Second, these walls are incredibly durable and flexible. Since there’s no rigid mortar, the wall can accommodate minor shifts in the ground from freeze-thaw cycles without failing. Finally, they are designed with performance in mind, often incorporating features that help with drainage—a critical factor for any retaining wall’s longevity. They are a key part of modern landscape supplies for good reason.
How to Choose the Right Interlocking Blocks
With so many options out there, picking the right interlocking block can feel a little overwhelming. But don't worry—it really comes down to matching the block to your project's specific needs. Think about the height of your wall, the look you're going for, and whether you're planning to build it yourself. Considering a few key factors will help you narrow down the choices and find the perfect fit for your landscape. Let's walk through what you need to look for.
Material and Durability
The first thing to consider is what the blocks are made of and how well they'll hold up. Most interlocking blocks are made from high-quality, high-density concrete, which is exactly what you want for a structure that needs to withstand the elements and immense pressure. Top brands design their blocks to exceed industry standards for strength. For example, some blocks have a minimum strength of 5000 PSI (pounds per square inch), making them incredibly strong and resilient. This ensures your wall won't just look good for a season but will stand strong for years to come. When you invest in quality masonry supplies, you're investing in peace of mind.
Size and Weight
Interlocking blocks come in a huge range of sizes and weights, from small units perfect for a simple garden border to massive blocks weighing thousands of pounds for commercial projects. The size you need depends entirely on the scale of your wall. For a small, decorative wall under a couple of feet high, smaller, lighter blocks are easy to handle and ideal for a DIY project. For taller, structural walls that need to hold back a significant amount of soil, you'll need larger, heavier blocks to provide the necessary stability. Before you order, it's a good idea to use a volume calculator to figure out exactly how much material your project requires.
Drainage Features
Proper drainage is non-negotiable for a retaining wall. Without it, water can build up behind the wall, creating immense pressure that can cause it to bulge, crack, or even fail completely. The best interlocking block systems are designed with drainage in mind. To ensure your wall lasts, you'll need to install a gravel base, add a layer of gravel behind the wall as you build, and place a perforated drainage pipe at the bottom to channel water away. We can help you get the right materials with our sand, stone, and gravel delivery service, making it easy to get everything you need for a solid, well-drained wall.
Color and Texture Options
Your retaining wall is a major feature in your landscape, so you want it to look great! Luckily, interlocking blocks are available in a wide variety of colors, textures, and styles. You can find options that mimic natural stone, have a sleek modern finish, or feature a classic weathered look. This allows you to choose a block that complements your home's architecture and your personal style. Whether you want your wall to blend seamlessly into the background or stand out as a stunning focal point, there's a design out there that will help you achieve the perfect aesthetic for your outdoor space.
Installation Difficulty
One of the biggest draws of interlocking blocks is how straightforward they are to install. Many systems are designed to be "mortarless," meaning the blocks fit together securely without needing cement to hold them in place. This makes building a small- to medium-sized wall a very manageable DIY project for a handy homeowner. The blocks often have a lip or pin system that helps with alignment and creates a solid connection. While the basic process is simple, keep in mind that larger, more complex walls may still require professional installation to ensure they are built safely and correctly. We have all the landscape supplies you'll need to get the job done right.
Top Brands for Interlocking Retaining Wall Blocks
Choosing the right brand for your retaining wall blocks is a big step. It affects not just how your wall looks, but how easy it is to build and how long it will last. The best brands combine strength, style, and smart design to make your project a success. Below, we’ll walk through some of the most trusted names in the industry, each offering unique benefits for your landscaping needs.
Our Selection of Masonry Supplies
While we don't manufacture the blocks themselves, we supply all the essential materials you need to build your wall correctly. A strong retaining wall starts with a solid foundation, which requires high-quality gravel and sand. We provide a range of masonry supplies to support your project from the ground up. Once your wall is built, you'll need the right soil or compost for backfilling. We can help you choose the perfect materials and offer convenient delivery right to your site, ensuring you have everything you need to get the job done right.
Unilock
Unilock is a fantastic choice if you're looking for serious strength and durability. Their retaining wall blocks are engineered from high-quality concrete and stone, designed to create lasting structures for any outdoor space. Whether you're trying to stabilize a tricky slope, build a beautiful raised patio, or add some privacy to your yard, Unilock has a product to match. They are well-known for their robust interlocking systems that ensure your wall stands strong against the elements for years to come, giving you both function and peace of mind.
Allan Block
If you're a DIY enthusiast, you'll appreciate the simplicity of Allan Block systems. They are specifically engineered to be easy to design and build, using a "mortarless" construction method. This means you don't need to mess with cement to hold the blocks together. Instead, they lock into place securely, creating a wall that is surprisingly flexible. This flexibility allows the wall to adapt to natural ground movements without cracking, often outperforming more rigid, traditional walls. It’s a smart, user-friendly approach to building a reliable retaining wall.
Techo-Bloc
For those focused on aesthetics, Techo-Bloc offers a stunning variety of garden and retaining walls. Their products are perfect for adding dimension and visual interest to your landscape. Instead of a flat yard, you can create different levels, terraced gardens, and beautiful raised features. Beyond just looking great, these walls are highly effective at preventing soil erosion, keeping your landscape intact. With a wide range of textures, colors, and styles, Techo-Bloc makes it easy to find the perfect look to complement your home and outdoor living space.
Belgard
Belgard strikes an excellent balance between durability and design. They offer a wide selection of interlocking retaining wall blocks that are built to last while also enhancing the beauty of your property. Their products are versatile enough for almost any landscaping project, from simple garden borders to complex, engineered walls. Homeowners and contractors alike trust Belgard for its consistent quality and appealing aesthetics. If you're looking for a reliable, attractive, and functional solution for your outdoor space, Belgard is a brand that consistently delivers on all fronts.
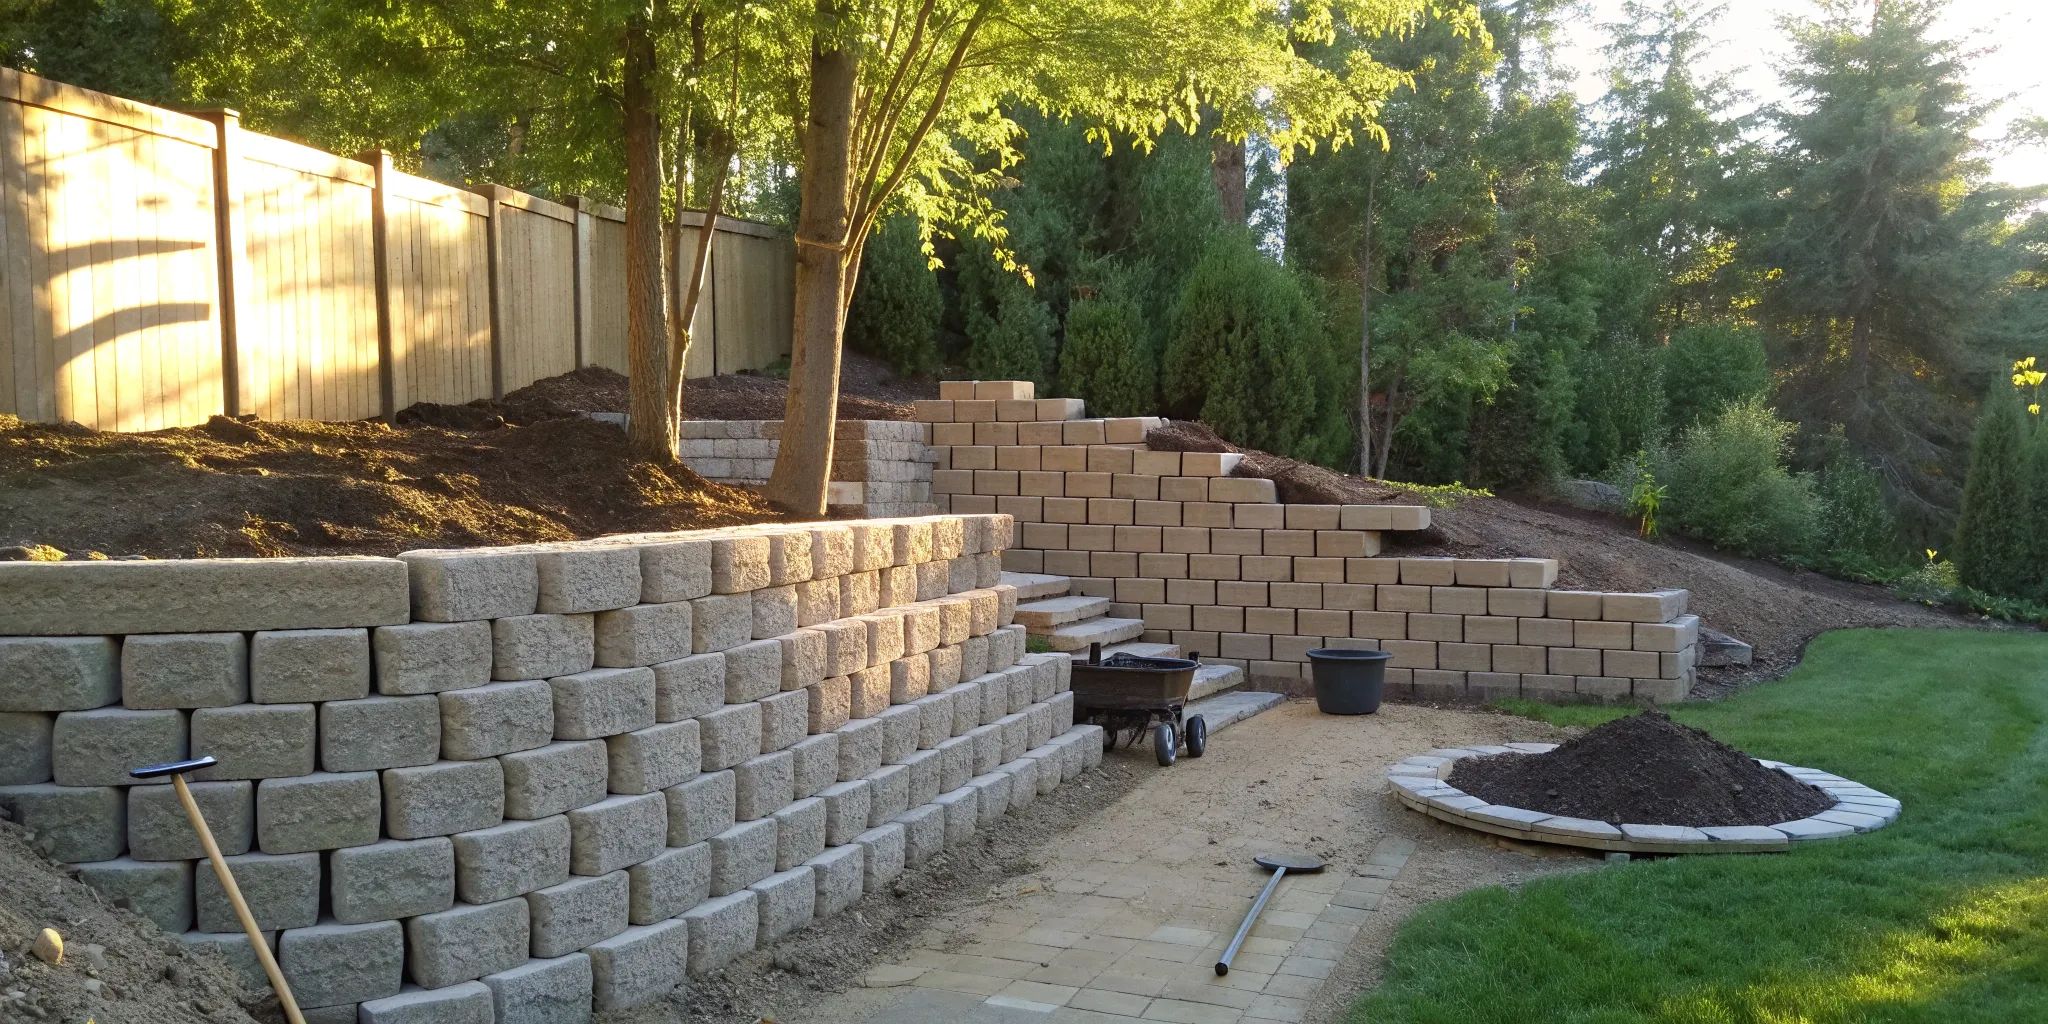
How to Build a Retaining Wall with Interlocking Blocks
Building a retaining wall is a rewarding project that can completely transform your landscape. With the right plan and materials, it's a job you can tackle yourself. Let's walk through the process step-by-step, from digging the first trench to placing the final capstone.
Gathering Your Tools and Materials
Before you start, make sure you have everything you need. A typical project requires a shovel, tape measure, level, string line with stakes, a hand tamper, and a rubber mallet. For safety, don't forget gloves and safety glasses.
Your main materials will be the interlocking blocks, crushed stone or gravel for the base, a bit of leveling sand, a perforated drainage pipe, and landscape fabric. You can find high-quality landscape supplies like gravel and sand to get your project started right. If the scope of the project feels overwhelming, it's always a good idea to look for contractors with a solid reputation and positive client testimonials to ensure the job is done correctly.
Preparing the Foundation
A strong wall starts with a solid foundation—this is the most important step, so don't rush it. Start by digging a trench where your wall will sit. A good rule of thumb is to make the trench deep enough to bury about half of your first block, plus at least six inches for the gravel base.
Once your trench is dug, add a thick layer of compacted gravel. For a sturdy base, aim for at least six inches of gravel, tamping it down in layers until it's firm and level. Add a final one-inch layer of leveling sand on top to make it easier to position the first course of blocks perfectly. Getting the right amount of material is easy with our volume calculator.
Installing the Blocks
With your foundation prepared, you can start laying the blocks. Place the first course of blocks snugly against each other on the leveling sand, using your level to ensure each one is perfectly even from front to back and side to side. Use a rubber mallet to make small adjustments.
For each new row, stagger the blocks so the joints don't line up with the row below—this running bond pattern adds significant strength. Most interlocking blocks have a lip on the back that helps them lock into the course below, creating a slight setback as you build. As you add each course, fill the space behind the blocks with more gravel to aid drainage.
Adding Drainage
Proper drainage is what keeps a retaining wall standing for years. Without it, water pressure can build up behind the wall and cause it to bulge or fail. The best way to manage water is to install a 4-inch perforated drainage pipe directly behind your first course of blocks.
Lay the pipe on the gravel base, ensuring it has a slight slope to direct water away from the wall. Cover the pipe with more gravel, and place landscape fabric between the gravel backfill and the native soil. This fabric acts as a filter, preventing soil from clogging your drainage system while still allowing water to pass through.
Common Mistakes to Avoid
Many retaining walls fail because of a few common, preventable errors. The biggest mistake is creating a weak foundation. Always dig a proper trench and use plenty of compacted gravel—it’s the key to stability.
Another frequent issue is poor drainage. Forgetting to install a perforated pipe and use gravel backfill is a recipe for a bulging, leaning wall over time. Finally, be meticulous about keeping each course level as you build. Even a small error in an early row will become a major problem as the wall gets taller. Taking your time on these key steps will ensure your wall looks great and lasts a lifetime.
Costs and Best Uses for Interlocking Blocks
Once you have a plan, it’s time to think about the budget and the specific job your retaining wall will do. Interlocking blocks are incredibly versatile, serving different needs for homeowners and professional landscapers. Whether you're creating a small garden bed or tackling a major commercial project, understanding the costs and applications will help you make the right choices and get the most value from your investment. From managing tricky slopes to adding beautiful, functional spaces to your yard, these blocks are a durable and attractive solution.
Budgeting for Your Project
Let's talk numbers. The cost of interlocking concrete blocks typically runs between $15 and $35 per square foot for materials. The final price depends on the specific style, size, and brand you choose. To get an accurate estimate for your project, you'll first need to figure out how many blocks you need. A great first step is to measure the length and desired height of your wall. You can use an online volume calculator to get a solid estimate of the materials required. This will help you create a realistic budget before you start buying supplies.
Residential vs. Commercial Projects
Not all interlocking blocks are created equal, and the right choice depends on the scale of your project. For most home projects, like garden walls or patio borders, residential blocks are perfect. They are generally around four inches high and are designed for smaller tasks. If you're working on a larger, heavy-duty wall that needs to support a significant amount of soil, you’ll want to look at commercial-grade blocks. These are much larger—often eight inches or more in height—and are built to handle high-load needs. You can explore a variety of options in our masonry supplies to find the right fit.
Controlling Erosion and Managing Slopes
One of the most practical uses for a retaining wall is to solve landscaping challenges like slopes and erosion. If you have a hilly yard, a retaining wall can transform that uneven ground into flat, usable areas. Think terraced garden beds, a level spot for a play set, or a new patio for outdoor dining. By holding back soil, these walls are incredibly effective at controlling erosion and managing water runoff. They turn a problem area into a functional and beautiful part of your landscape, adding both value and utility to your property.
Maintenance and Long-Term Value
Interlocking block walls are built to last, but a little maintenance goes a long way in keeping them strong and stable for years to come. A few times a year, walk the length of your wall and check for any cracks or blocks that may have shifted. It's also important to ensure the drainage system is clear and working properly to prevent water pressure from building up behind the wall. One pro tip: avoid planting large trees or shrubs too close to the wall, as their roots can cause damage over time. With simple care, your retaining wall will remain a durable, long-term feature of your landscape.
Frequently Asked Questions
How high can I safely build an interlocking wall myself? Generally, if your wall is going to be under four feet tall, it's often a manageable DIY project. Once you start planning a wall taller than that, things get more complex. Taller walls need to hold back a much greater amount of soil pressure and often require a professional engineer's design to ensure they are safe and properly constructed. Always check your local building codes, as many municipalities have specific height limits for walls built without a permit.
Do I really need all that gravel and a pipe for drainage? Yes, you absolutely do. It might seem like an extra, skippable step, but proper drainage is the single most important factor in your wall's longevity. Without a path for water to escape, it will build up behind the blocks and create immense pressure. This pressure is what causes walls to lean, bulge, and eventually fail. The gravel and perforated pipe are your wall's insurance policy against water damage.
Are special blocks needed to build a curved wall? Most standard interlocking blocks can be used to create beautiful, sweeping curves without needing special pieces. The blocks are typically trapezoidal—slightly narrower in the back than in the front. This shape allows you to arrange them in a gentle arc. For tighter curves, you may need to make some adjustments, but the inherent design of the blocks gives you a lot of flexibility to create flowing lines in your landscape.
What's the difference between a retaining wall and a simple garden wall? The main difference comes down to function. A true retaining wall is an engineered structure designed to hold back a significant amount of soil and bear a heavy load, like on a sloped yard. A garden wall, on the other hand, is usually shorter, more decorative, and primarily serves as a border for a raised flower bed. While they might look similar, a retaining wall requires a much more robust foundation and drainage system to handle the pressure behind it.
How do I finish the top of the wall? The best way to give your wall a clean, professional look is with capstones. These are flat, solid blocks designed specifically for the top course. They provide a finished surface and help secure the blocks below them. For extra stability, especially in areas with foot traffic, it's a good idea to secure the capstones with a high-quality concrete adhesive. This final touch ties the whole project together.